[x]Blackmoor Vituperative

Thursday, 2022-09-08

Bulk Crap Uninstaller

Filed under: Software,Windows — bblackmoor @ 14:03

If you are a Windows user looking for a replacement or alternative for Iobit Uninstaller (which has become little more than a vector for trojans), give Bulk Crap Uninstaller a try.

https://www.bcuninstaller.com/

Friday, 2022-04-29

Trimming trailing spaces in LibreOffice Calc

Filed under: Software,Windows — bblackmoor @ 13:39

I looked for ages before I found this advice, so I am preserving it here. Credit goes to Keyboard Playing for the original post, though.

In LibreOffice Writer, you can replace \s+(\r?(\n|$)) with $1 to remove all trailing spaces. A single execution should be efficient this time.

The regular expression (aka “regex”) can be decomposed this way:

\s+ matches one or more whitespaces;
(\r?(\n|$)) matches a carriage return (\r?\n) or the end of a paragraph (\r?$) ; \r? is there only to be compatible with Windows carriage return format;
$1 is the first captured group ((\r?(\n|$))) as it was found in the text (we put back what was found).

Friday, 2021-10-01

File name is too long in Windows 10

Filed under: Windows — bblackmoor @ 11:15

If you run into an error in Windows that a file name is too long, here is how to fix it (read the whole article before you do anything).

https://helpdeskgeek.com/how-to/how-to-fix-filename-is-too-long-issue-in-windows/

Monday, 2016-11-28

How to copy a folder and retain its permissions in Windows 10

Filed under: Windows — bblackmoor @ 10:25
  1. Click the Start button.
  2. In the search box, type “command”.
  3. Right-click the “Command Prompt” item, and select “Run as administrator”.
  4. In the command prompt that opens, type

    xcopy sourcepath destinationpath /O /X /E /H /K

    and then press ENTER, where sourcepath is the source path for the files to be copied, and destinationpath is the destination path for the files.

  5. For example:

    xcopy C:\Users\Public D:\Public /O /X /E /H /K

Monday, 2016-03-28

Playing music into a Google Meet

Filed under: Music,Podcast,Software,The Internet,Windows — bblackmoor @ 11:04

Here is how I play music (MP3 files) into a Google Meet.

Hardware

Software

Setup

  1. Install “Audio Repeater Pro (64 bit)” and “VB Cable A+B”. Don’t mess with the settings. Just install them.
  2. Run “Audio Repeater Pro (64 bit)”. Use these settings:
    • Input Device: Microphone (Logitech G935 Gaming Headset)
    • Output Device: CABLE Input (VB-Audio Cable B)
    • Stream Format: Processing Format (default)
    • Stream Buffer: 40 milliseconds (default)
    • Process Audio: (not checked)
    • Stream Gain: 100%
    • Stream FX: FX Chain (default)
    • Bypass FX Chain: (not checked)
    • Click “Start”.
  3. In the task icon area of the taskbar, right-click the speaker, and select “Recording Devices”.
    1. Right-click Microphone (Logitech G935 Gaming Headset), and select “Set as Default Device”.
    2. Right-click Microphone (Logitech G935 Gaming Headset), and select “Properties”.
      • On the “Listen” tab, set to UN-check “Listen to this device”.
      • On the “Levels” tab, set to 90.
      • Click OK.
    3. Right-click CABLE-B Output, and select “Properties”.
      • On the “Listen” tab, CHECK “Listen to this device”.
      • On the “Listen” tab, set “Playback through this device” to “Speakers (Logitech G935 Gaming Headset)”.
      • On the “Levels” tab, set both to 100.
      • Click OK.
  4. In the “Playback” tab of the Sound application.
    • Right-click the headset, and select “Set as Default Communication Device”.
  5. Run Chrome.
  6. In Chrome, go to Google Meet, and join the meeting.
  7. When the Meet window opens, click the three dots in the bottom right corner and click “Settings”. On the Audio tab, use these settings:
    • Microphone: CABLE Output (VB-Audio Cable B).
    • Speakers: Speakers (Logitech G935 Gaming Headset).
  8. Open VLC Media Player.
    1. Add songs to the playlist.
    2. In the Audio menu, select Audio >> Audio Device >> CABLE Input (VB-Audio Cable B)
  9. Invite people to join the hangout.
  10. Play songs in VLC. Other people in the Hangout will hear them. To avoid drowning myself out, I set the VLC output level to about 80%.

Recording

Here are the settings I used to record in Flashback Express.

  1. In the Tools >> Options menu, look in the Sound section.
  2. Under Sound Source, select “PC Speakers (what you hear)”.
  3. In the drop-down under “PC Speakers (what you hear)”, select the headset.
  4. Now, when recording in Flashback Express…
    1. Under “Record”, select “Window”.
    2. Check “Record Sound”.
  5. Still in Flashback Express, in the sound section, check “Record Sound”, and for the source select “Speakers (Logitech G935 Headset)”.

When done with the hangout

  1. Close the Hangout window.
  2. Click “Stop” in “Audio Repeater Pro (64 bit)”, and close it.
  3. Close VLC Media Player.

Friday, 2015-07-31

Windows 10 tips

Filed under: Windows — bblackmoor @ 15:56

These are notes for my own purposes, but they might be useful to others, as well. Note that it might be helpful for you to download the Windows 10 installation media yourself, rather than waiting for Microsoft to send it to you

  1. Re-install video drivers and mouse drivers
    I had weird problems until I did this. Make sure you get the newest drivers.
  2. Enable Privacy
  3. Turn on System Protection
    1. Open a File Explorer window
    2. Right-click This PC and choose Properties
    3. Select System Protection in the left pane
    4. Select C: drive in the dialog box that opens
    5. Click the Configure button
    6. Select “Turn on system protection” option
    7. Set disk space usage to around 1.5 GB.
  1. Move the Taskbar
    Move the Taskbar to the left side of the screen. With a widescreen monitor (which any new computer will have), it makes much more sense to waste a small strip on the left than a strip that runs all the way across the bottom of the screen, making a narrow display area even narrower.
  2. Modify Start Menu
    1. Open the Start Menu, right click each pane, and select “Unpin from Start” (optionally, keep the Weather pane, but open it up and set the correct location)
    2. Unpin the Edge and Store icons from the taskbar
    3. Right-click the taskbar and hide the Search and Task View icons from the taskbar
  3. Clean Up Programs
    1. Open the Start Menu, click Settings >> System >> Apps & Features
    2. Sort by name
    3. Uninstall…
      • Get Office
      • Get Skype
      • Microsoft Solitaire Collection
  1. Install KeyTweak and remap the Caps Lock key to Left Shift
  2. Install Ditto clipboard manager
  3. Install Search Everything
  4. Customize Windows Explorer
    1. Customize Quick Access Toolbar
      This is a small drop-down arrow at the top of Windows Explorer.
      Select “Show below the Ribbon”
    2. Customize Options
      Click “View” button on the Ribbon, click the “Options” button, and select “Change folder and search options”. I am only noting changes from the default settings.


      1. General
        • Open File Explorer to: This PC
        • Show recently used files in Quick Access: unchecked
        • Show recently used folders in Quick Access: unchecked
      2. View
        • Always show menus: checked
        • Display the full path in the title bar: checked
        • Hidden files and folders: Show hidden files, folders, and drives
        • Hide empty drives: not checked
        • Hide extensions for known file types: not checked (this is the most idiotic option ever)
        • Hide folder merge conflicts: not checked
        • Hide protected operating system files: not checked
        • Restore previous folder windows at logon: checked
        • Expand to open folder: checked
        • Show libraries: checked
        • Click the “Apply To Folders” button, and click OK
    3. Show Libraries in Navigation Pane
    4. Add a Take Ownership context menu
    5. Remove Homegroup link from the Explorer navigation pane (may cause a hard-to-fix file/folder rename bug)
    6. Remove the user folder from the Explorer navigation pane. (may cause a hard-to-fix file/folder rename bug)
  5. Install AquaSnap
  1. Install Winaero Tweaker
    The settings below are only the changes from the default.


    1. Behavior
      • Disable AeroShake: Checked
      • Disable AeroSnap: Checked
      • Disable App Lookup In Store: Checked
    2. File Explorer
      • Customize This PC Folders: remove all
      • Disable “- Shortcut” Text: checked
      • Drive Letters: Drive Letters Before Labels
  2. Install Open Shell Menu
    It gives you a simpler to use Start menu.
  3. Install Stacky
    It lets you group pinned icons on the Windows 10 taskbar.
  4. If you use Photoshop, install SageThumbs
    It’s an open source Windows shell extension allowing you to see thumbnails of Photoshop files.
  5. Disable and remove OneDrive
  6. If you use DropBox, remove DropBox link from the Explorer navigation pane
  7. If you use DropBox, pin the DropBox folder to Quick Access
  8. Install Q-Dir
    Despite the changes I made above, I still found the default Windows File Explorer frustrating. I tried a number of alternate file managers, including Explorer++, FreeCommander, and XYplorer. Q-Dir met my needs better than anything else I tried.

Now that you have done all of that, there are a few essential applications you should consider installing:

  1. 7-Zip
  2. Bulk Rename Utility
  3. Firefox You might also consider these addons:
    • Absolute Right Click And Copy
    • Context Search
    • F.B. Purity (and hide the Trending pane)
    • Lastpass
    • New Tab Override
    • ReloadMatic
    • Simple Tab Groups
    • uBlock Origin
    • Undo Closed Tabs Button
  4. ImageGlass
  5. Ninite Updater
  6. Notepad++
  7. Putty
  8. Putty Session Manager
  9. VLC media player (see the note below about file associations)
  10. WinSCP

Monday, 2011-03-07

Photoshop (*.psd) thumbnails in Windows 7/8

Filed under: Software,Windows — bblackmoor @ 09:07

There are a lot of people asking about this, and a great many sites which tell you how to set it up. They all entail copying DLL files and registering them, etc. Sadly, these methods do not work on 64-bit Windows Vista/Windows 7 or Windows 8. Here is what works:

It costs money ($10, as of this moment, but it’s usually $15).

Saturday, 2011-01-29

Windows 7 network adapter stops working

Filed under: Windows — bblackmoor @ 16:09

I am putting this here in case someone else has the same problem. The network adapter in my laptop kept disconnecting (not all the time — once a day, generally). I could not figure out why. These links helped me solve the problem.

I hope this helps someone.

Monday, 2010-09-20

Windows 7 missing scrollbar in Explorer navigation pane

Filed under: Windows — bblackmoor @ 16:45

Where is the horizontal scrollbar in the left (navigation) pane? This annoys me no end.
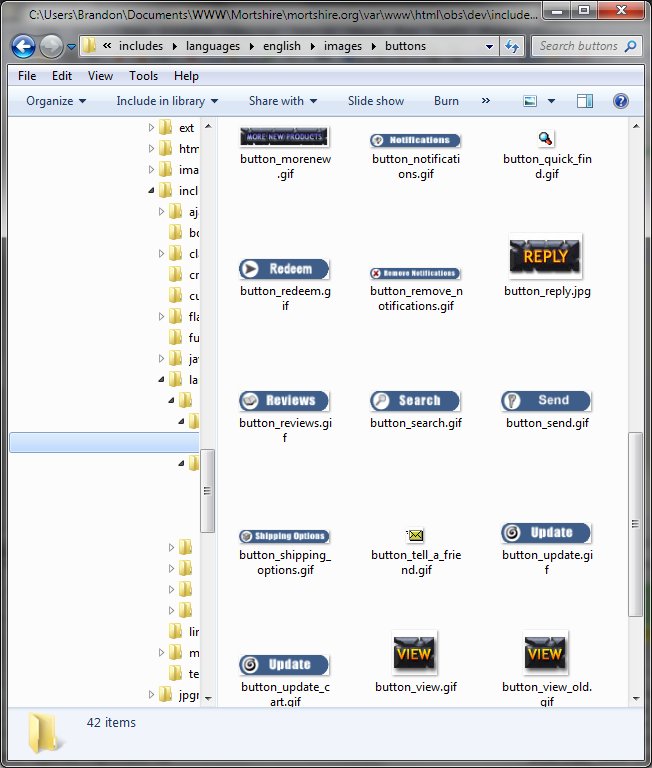
Where is the horizontal scrollbar in the left (navigation) pane?

Saturday, 2010-03-13

14 Windows 7 tips

Filed under: Windows — bblackmoor @ 14:12

If you are installing Windows 7, or if you just got a new computer, there are a few things you should do before you start using it. Here they are.

  1. Configure the Start Menu.
    • Right-click the Windows logo on the taskbar.
    • Select “Properties”.
    • On the “Start Menu” tab, click the “Customize” button.
    • Computer: display as a menu.
    • Connect to: not checked.
    • Control panel: display as a menu.
    • Default programs: not checked.
    • Devices and printers: not checked.
    • Documents: display as a menu.
    • Downloads: do not display this item.
    • Enable context menus: checked.
    • Favorites menu: not checked.
    • Games: do not display this item.
    • Help: not checked.
    • Highlight newly installed programs: not checked.
    • Homegroup: not checked.
    • Music: display as a menu.
    • Network: not checked.
    • Open submenus: checked.
    • Personal folder: do not display this item.
    • Pictures: display as a menu.
    • Recent items: checked.
    • Recorded TV: do not display this item.
    • Run command: checked.
    • Search other files: search with public folders.
    • Search programs: checked.
    • Sort All programs menu: checked.
    • System administrative tools: Don’t display this item.
    • Use large icons: checked.
    • Videos: Display as a menu.
  2. Configure Windows Explorer.
    • Hide Libraries. (Or hide favorites, but you certainly do not need both.) (I changed my mind about this. I actually do use both.)
    • Make your local network a Work network (or just hide Homegroup).
    • Open Windows Explorer, click the “Organize” button, and select “Folder and Search options”.
      1. On the “General” tab…
      2. Show all folders: not checked
      3. Automatically expand: checked
      4. On the “View” tab…
      5. Always show icons: not checked.
      6. Always show menus: checked.
      7. Display file icon: checked.
      8. Display file size: checked.
      9. Display the full path: checked.
      10. Hidden files and folders: Don’t show (we will do something about this further down).
      11. Hide empty drives: not checked.
      12. Hide extensions: not checked (this is the most idiotic option ever).
      13. Hide protected OS files: not checked.
      14. Launch folder windows in a separate process: not checked.
      15. Restore previous folders: checked.
      16. Show drive letters: checked.
      17. Show encrypted: checked.
      18. Show pop-up: checked.
      19. Show preview handlers: checked.
      20. Use check boxes to select: not checked.
      21. Use Sharing Wizard: checked.
      22. When typing into list view: Select the typed item.
      23. Click the “Apply To Folders” button, and click OK.
  3. Configure My Documents.
    • In Windows Explorer, navigate to “C:\Users\[your user name]”.
    • Right-click “My Documents”, and rename it to “Documents”.
    • Right-click “My Music”, and rename it to “Music”.
    • Right-click “My Pictures”, and rename it to “Images”.
    • Right-click “My Videos”, and rename it to “Videos”.
    • Drag and drop “Music” into the “Documents” folder.
    • Drag and drop “Pictures” into the “Documents” folder.
    • Drag and drop “Videos” into the “Documents” folder.
    • Drag and drop “Downloads” into the “Documents” folder.
  4. Move the Taskbar to the left side of the screen. With a widescreen monitor (which any new computer will have), it makes much more sense to waste a small strip on the left than a strip that runs all the way across the bottom of the screen, making a narrow display area even narrower.
  5. Install Classic Shell.
  6. Install Toggle Hidden Files and assign a hotkey to it (I use “Windows+h”).
  7. Show drive letters before the drive name.
  8. Install Search Everything.
  9. Install KeyTweak and remap the Caps Lock key to Left Shift.
  10. Add a Take Ownership context menu to Windows Explorer.
  11. Install Ditto clipboard manager.
  12. Install AllSnap (the 64 bit version, if you are running 64-bit Windows). You must disable “Aero Snap” (which is useless) first!
  13. If you use Photoshop, install FastPictureViewer Codec Pack
  14. Remove the user folder from the Explorer navigation pane.

Now that you have done all of that, there are a few essential applications you should consider installing:

  1. 7-Zip
  2. Notepad++
  3. Firefox You might also consider these addons:
  4. Thunderbird with the calendar plugin (You might also consider linking Thunderbird’s address book and calendar to Google.)
  5. Irfanview and the Irfanview plugins
  6. OpenOffice LibreOffice
  7. Avast! Free Antivirus (I eventually uninstalled this. It was just too much of a resource hog, even on a brand new computer.)
  8. Copernic Desktop Search (I paid for the professional version. I think it’s worth it.) (I eventually uninstalled this. It was just too much of a resource hog, even on a brand new computer.)
  9. SmartDefrag
  10. Dexpot
  11. Bulk Rename Utility
  12. FontExpert (It costs money, but if you work with fonts a great deal, it is worth it.) When you put fonts into groups, make sure you create shortcuts, rather than copying the font files.
  13. PeerBlock (Idon’t use this anymore. It interfered with games and I think the benefit is dubious.)
  14. Install VistaSwitcher
Next Page »